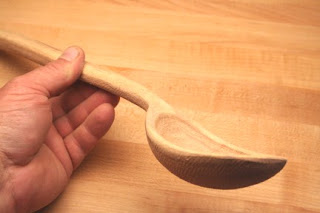
Here I have rough hollowed the bowl of the spoon in a rough billet of air dried Mesquite. You can also use green wood but you will have to wait till your spoon dries to do the final shaping and sanding. By cutting in from outside of the tree you will get a nice pattern of concentric rings. In woods with different colored sap wood like this Mesquite you will get the light rim around the bowl and a dark oval of heart wood in the bottom of the bowl. This is my favorite way to work. There are many ways to start a spoon. You can draw the shape of the entire spoon, cut it out and then hollow the bowl. But I like to start with the bowl first . Because of the shape of my billet this will be a left handed spoon.
After drawing some rough lines to indicate the plan view of the spoon I have removed the waste with my 18 inch bandsaw. This step can also be done with a hand saw, drawknife or a hatchet. The shape will be further refined in later steps.
In the above two pictures I have removed most of the waste with the bandsaw and the draw knife. You just keep removing wood in small cuts, sneaking up on the shape. This is all done by eye. Now I am ready to do the final shaping with a spoke shave and a patternmaker"s rasp.
In the last two pictures I have deepened and refined the hollow of the bowl and done the final shaping of the spoon with the patternmaker's rasp. Some fine adjustments to the shape will be made during sanding. This spoon will now be sanded to 320 grit and the grain will be raised between sanding to prepare the spoon for use in the kitchen. Then it will be steeped in a bath of hot beeswax and mineral oil.
That's it. Your first one will take you a day or two to finish. After some practice you will be able to do one in a couple hours. That is the beauty of spoon making. Grab any old piece of wood and with a a few simple tools you can make something nice in no time at all. And this is the most laid back kind of wood working. Notice I did not mention a tape measure at all. Your eyes and your fingers are all the measuring devices you will need. In the next instalment I'll tell you how to choose your wood.
The spoon all finished.


That's a great description of the process, and I appreciate the clear photos. I've done a good bit of spoon making myself, and have developed my own style and techniques, primarily involving hand tools. I love seeing how other guys approach the task. Mesquite is a great wood for spoons, and I wish I could get more of it where I live.
ReplyDeleteI see you're using a machinist vise with wooden pads for part of the process. Does that make the workpiece more accessible for your tools than other types of vises?
Steve S.
http://literaryworkshop.wordpress.com/
That is actually a gun stock carver's vice that I got at Woodcraft in Denver. It is great because it can clamp odd shaped pieces with its pivoting wood jaws. For most of my work I use the shaving horse I got from Country Workshops in North Carolina. It is the best tool I have found for holding my work plus it's just plum fun to use.
ReplyDeleteI would love to see your work sometime. What local woods do you have that you really like? I am tempted to go up to Minnesota to get some European Buckthorn that is an invasive species that is literally taking over up there. From pictures I have seen it is quite interesting as a spoon wood.
Robert, here's a link to a couple posts on my own blog, where I show a bit of my own work:
ReplyDeletehttps://literaryworkshop.wordpress.com/category/woodenware/
I've used a few different woods, though not as many as you have. I love working mesquite when I can get it, but that isn't often. Cherry, of course, works and finishes beautifully, and I can get it locally. Hard maple is tough to work, but the results are worth it. I've been using some of the first hard maple spoons I made in the kitchen, and they wear very well. That wood came from my in-laws' place in the Midwest, and my stock has long since run out. Lately I've been using pecan, just because I happen to have a lot from a log I salvaged. Finishing it smoothly is a trick, but I finally figured it out, and it's wonderfully durable in use. I've used a bit of water oak, which works easily but feels a little too brittle, so I haven't used it much.
The gunstock vise makes a lot of sense. I wouldn't have guessed! If production ever picks up in my shop, I may have to invest in one.
Nice step by step. It is fun to see how another spoon maker approaches the project. Nice photos too.
ReplyDelete