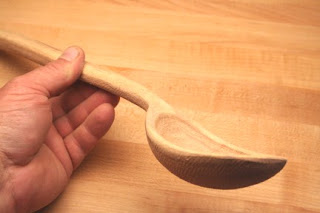
Here I have rough hollowed the bowl of the spoon in a rough billet of air dried Mesquite. You can also use green wood but you will have to wait till your spoon dries to do the final shaping and sanding. By cutting in from outside of the tree you will get a nice pattern of concentric rings. In woods with different colored sap wood like this Mesquite you will get the light rim around the bowl and a dark oval of heart wood in the bottom of the bowl. This is my favorite way to work. There are many ways to start a spoon. You can draw the shape of the entire spoon, cut it out and then hollow the bowl. But I like to start with the bowl first . Because of the shape of my billet this will be a left handed spoon.
After drawing some rough lines to indicate the plan view of the spoon I have removed the waste with my 18 inch bandsaw. This step can also be done with a hand saw, drawknife or a hatchet. The shape will be further refined in later steps.
In the above two pictures I have removed most of the waste with the bandsaw and the draw knife. You just keep removing wood in small cuts, sneaking up on the shape. This is all done by eye. Now I am ready to do the final shaping with a spoke shave and a patternmaker"s rasp.
In the last two pictures I have deepened and refined the hollow of the bowl and done the final shaping of the spoon with the patternmaker's rasp. Some fine adjustments to the shape will be made during sanding. This spoon will now be sanded to 320 grit and the grain will be raised between sanding to prepare the spoon for use in the kitchen. Then it will be steeped in a bath of hot beeswax and mineral oil.
That's it. Your first one will take you a day or two to finish. After some practice you will be able to do one in a couple hours. That is the beauty of spoon making. Grab any old piece of wood and with a a few simple tools you can make something nice in no time at all. And this is the most laid back kind of wood working. Notice I did not mention a tape measure at all. Your eyes and your fingers are all the measuring devices you will need. In the next instalment I'll tell you how to choose your wood.
The spoon all finished.


